When I operate satellite-portable, I use a netbook computer running Ham Radio Deluxe software to show the "radar plots" for satellites as they pass overhead. These plots consist of concentric circles (representing elevation) and cross-hairs (representing azimuth), and the curved line on the radar plot represents where the satellite will be as it goes by.
But what if a computer isn't available during the pass??
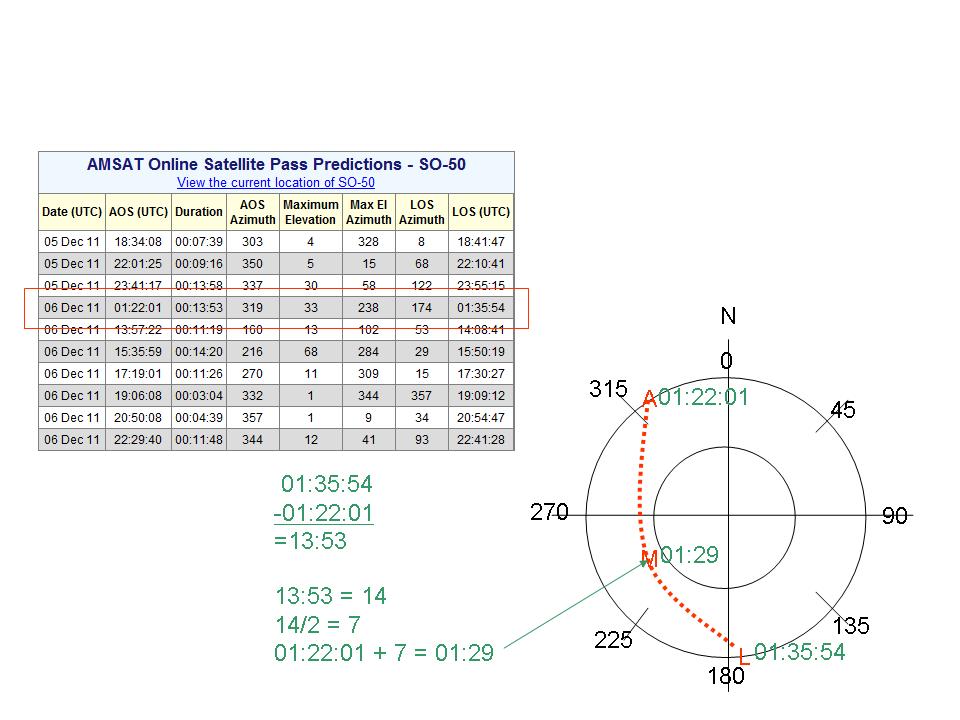
It's actually pretty straightforward to hand-draw a radar plot based on just some simple information printed out previously from any of the standard satellite prediction web pages or software modules. I'll often take such a list (ie. all passes for the next 5 days) with me while operating satellite portable, just in case the computer goes down and can't provide real-time tracking. The method below shows how to create your own radar plots.
Step 1: Start with a table of passes. You can obtain these from various tracking packages, or from the http://www.amsat.org website.
Step 2: Draw a crosshair on a piece of paper. Mark one end "N" for north:
Step 3: Draw two concentric circles on the crosshair. The outer one represents the horizon, the inner one represents an elevation of 45 degrees:
Step 4: Add four tick marks to the perimeter of the outer circle at 45, 135, 225, and 315 degrees:
Step 5: Write the degree markings around the azimuth circle: 0, 45, 90, 135, 180, 225, 270, and 315 degrees:
Step 6: Mark the AOS (acquisition of signal) on the perimeter circle. In this example, the AMSAT prediction table shows the AOS at 319 degrees. Mark with a letter "A":
Step 7: Mark the LOS (loss of signal) on the perimeter circle. In our example table, LOS occurs at 174 degrees. Mark with a letter "L":
Step 8: Draw a faint line between the AOS and LOS marks. This will tell you if the satellite is passing overhead to the east or west. In this case, our satellite will pass to the west of the North-South line:
Step 9: Mark the position of Maximum Elevation on the plot. Max El will occur about half way along the AOS-LOS line, and the elevation will come from the value in the table. In this case, a Max El of 33 degrees is roughly 2/3 of the way from the outer circle (0 degrees El) to the middle circle (45 degrees El). Place a letter M at the point of max elevation:
Step 10: Draw a smooth curve from the AOS, through Max El, to LOS:
Step 11: Now it's time to add times to the plot. Take the time of AOS from the chart and add it to the circle next to the A:
Step 12: Similarly, copy the time for LOS to your plot:
Step 13: The time of Max Elevation is half way between the times of AOS and LOS. You can usually guesstimate this time, or you can subtract the AOS from LOS, divide by two, and add to AOS. Mark the time next to the M:
Step 14: Now add the times half-way between AOS and Max El, and Max El and LOS. I find guesstimating is usually more than adequate:
Now you're done! You've gone from a table of a few numbers to a nice handy radar plot, suitable for tracking the satellite as it moves across the sky. Of course the chart isn't dead on accurate, but given the beamwidth of our handheld antennas, it's more than close enough to accurately aim them.
Here's another example from a different pass.
First, draw your crosshairs and mark the A for AOS and the L for LOS:
Next, mark the position of Max Elevation with an M:
After that, draw the curved line connecting the letters, to show the path of the satellite:
Next, mark your AOS and LOS times:
And finally mark the intermediate times:
Easy!
Again, these plots aren't intended to replace the precision of a real-time computer tracking display, but I have found that knowing how to create these plots is a really useful backup for when the computer isn't around.
This weekend was one of the ARRL EME (Earth-Moon-Earth) contests, and I spent quite a bit of time listening for signals reflected from the moon. The signals I was listening to were JT65b type, which is a coded series of tones; WSJT software can encode and decode these tones, translating them to and from text on a computer screen. After hearing a number of particularly loud stations, I was able to make an EME contact, yay!!
The following screen shows the spectrogram of K5GW's (Texas) signal reflected from the moon a few minutes before the contact:
And the next screen shows the WSJT software on my computer after decoding K5GW's reply to me.
At first I didn't believe that the decode was real, but shortly thereafter a ham at Stanford sent me an email saying he heard the reply too:
112 -89 0 1602 3.0 -12 KB5WIA K5GW EM13 OOO 1 0
The numbers above indicate that at 1602 UTC, the Stanford station heard a signal coming from K5GW with a 3.0 second time delay (it takes 2.6 seconds for a signal to get to the moon and come back, plus a fraction of a second of clock error). The -12 indicates the relative signal to noise ratio (a very strong signal). KB5WIA is my call sign, the EM13 is K5GW's grid locator, and the OOO is a shorthand for "I've heard your signal reflected from the moon and I'm replying to you". The 1 after the OOO's indicates that the WSJT software has decoded all of this information successfully with no errors.
The power I used was 30 watts (a Yaesu FT-817ND running at 2.5 watts into an RFConcepts 2 to 30 watt linear amplifier), essentially the VHF part of my normal satellite station:
The antenna was the same M2 2M7 seven element 2 meter yagi that I normally use for satellite uplink and downlink:
All in all, pretty exciting to have ham radio signals travel 250,000 miles to the moon, bounce off the rocks and dust up there, and then travel 250,000 miles back to earth and be picked up!!!!
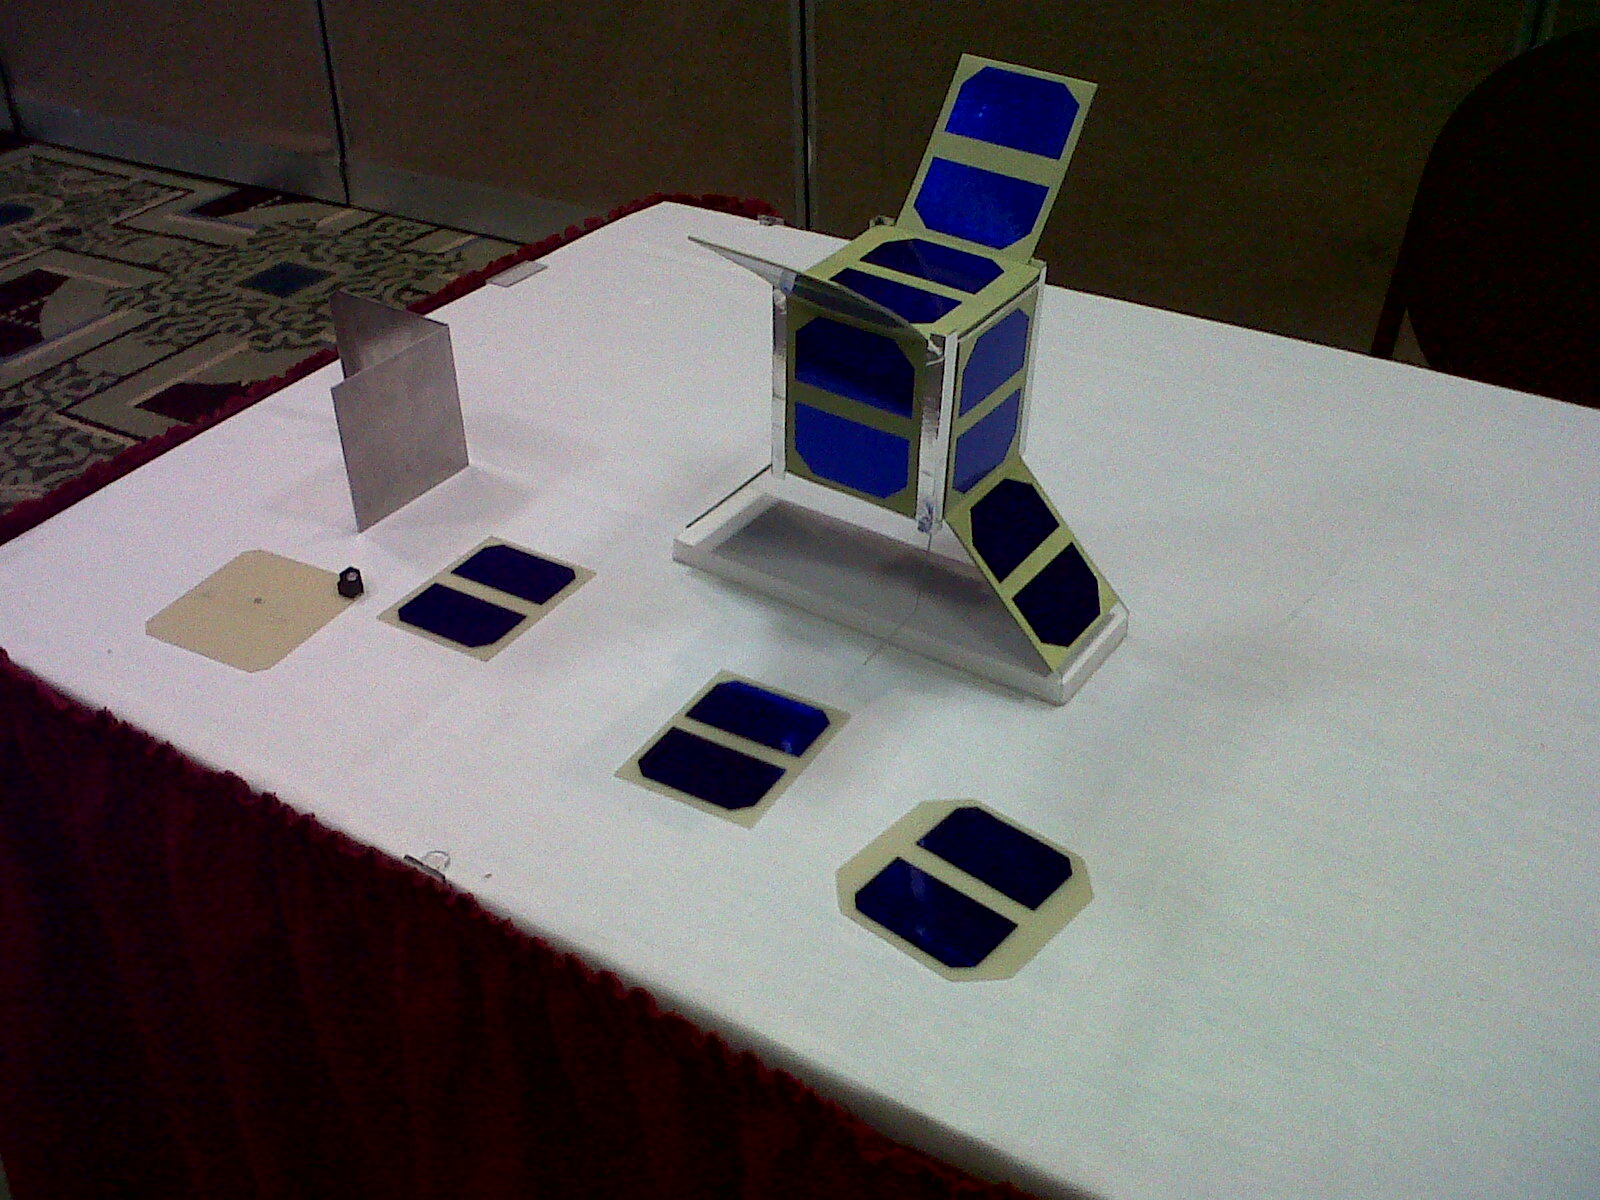
The 2011 AMSAT Symposium in San Jose was a lot of fun -- many very interesting talks / papers, and it was good to meet people involved with the satellites. Of special interest were models of the ARISSAT-1 satellite, launched from the International Space Station in July of this year:
The restored actual prototype of the Oscar-1 satellite (first ham radio satellite in orbit) launched in 1961:
And the next generation ham radio satellite, project Fox, set to be launched perhaps in 2013:
I moved the satellite array from the tripod in the center of the backyard, to a pole closer to the house. Doing so gives about 5 degrees better view towards the horizons. Going clockwise from the North, the antennas can see down to around 15 degrees; northeast, 10; east, 7; southeast, 2; south, 4; southwest, 10; west, 1; and northwest, 10 degrees. Much better than previous!! The antenna array has the ARR SP432VDG and SP144VDG preamplifiers in the junction box, and is fed with 75 feet of LMR-600 coax for UHF and LMR-400 coax for VHF.
This year marked a return to Brokeoff Mountain in Lassen National Park for the annual ARRL September VHF Contest!
Lassen National Park is in grid square CN90, which is relatively rare for ham radio operators in the San Francisco Bay area. The grid square is at the north end of the California central valley, and the peaks in Lassen Park have great radio "views" over much of the valley and also into southern Oregon.
The trail to Lassen Peak (10,600') was closed for repair work, so we hiked to the summit of Brokeoff Mountain (9,200') instead.
The trailhead up Brokeoff begins just at the southern border of the National Park, and climbs 2600 vertical feet over 2 miles. It took Melanie and I just about three hours to hike it. Weather conditions were near perfect cool temperatures and light winds.
Once at the summit, I set up my standard portable VHF radio gear. This consisted of a Yaesu FT-817ND all-mode transceiver, an Elk dual-band log periodic antenna for 2 meters and 70cm, an M2 HO-Loop antenna for 6 meters, all powered by a K2 Energy LiFePO4 battery pack and 2x20 watt PowerFilm solar panels.
I spent a total of three hours with the contest on the summit. I worked a few stations in southern Oregon, and quite a few stations in northern California. One ham had driven to the top of nearby Burney Mountain (about 30 miles away) and could literally see my operating position! I made around 50 contacts, and worked nine different grid squares. It was a lot of fun!
The portable equipment worked well. With over nine thousand feet of antenna height, the 5-watt radio was just about enough to work all of the stations that I could hear. The Elk antenna had enough gain to hear most of the stations in the Bay Area (200 miles awa!) and surprisingly the HO-Loop had enough gain that I could usually contact any stations that I had worked on the 2-meter band, also on the 6-meter band. The solar panels were putting out around 25 watts, more than enough to power the radio and keep the battery charged.
The trip down the mountain went well - lots of nice views!
Overall it was a good trip. Not an easy hike, but definitely rewarding in terms of radio contacts and scenery!
CM79/CM89/CN70/CN80 Grid Activation - August 7/8 2011
Background
The world can be divided into squares of latitude and longitude. Squares 2 degrees wide by 1 degree tall are called "Maidenhead Grid Squares" and are a very convenient location reference point for ham radio operators. 2x1 grid squares are identified by a pair of letters and numbers, and there are 488 of these squares that cover the continental USA. Up until last year, no ham had ever contacted all 488 grid squares at VHF frequencies -- until Russ KB8U travelled to the remote California Lost Coast with radio equipment to "activate" one of the rarest (and last-needed) grid squares: CM79.
CM79 is on the coast of Northern California. The grid square is almost entirely ocean, with just a small portion (less than a square mile) at the northeast corner extending into land. The land where CM79 brushes against contains no roads; no power; not even any trails run through CM79. It is surrounded by the primitive wilderness of the King Range National Conservation Area, and is only accessible by a 2.5-mile hike up and over Chemise Mountain.
When I read the story KB8U backpacking 6-meter band VHF radio equipment into the remote CM79 grid area, I was inspired to try something similar. Ham radio satellite operators also collect grid squares, and CM79 is exceptionally rare. How difficult could it be to activate CM79 for the amateur satellite community?
Difficult Terrain and Multiple Grids
The terrain of CM79 is quite inhospitable to VHF and UHF radio communication. The entire land portion of the grid square lies on the steeply sloping *west* side of Chemise Mountain. This means that any radio communication to the east (the rest of the country), necessarily means finding a way to get the signal over the top of the mountain. Fortunately, the actual northeast tip of CM79 is only 70' downhill from the ridgeline. Russ solved this problem in 2010 by using a remote operating location, and remote antenna, to keep his transmitter exactly over CM79 while having the antenna with a view to the east.
By having his transmitter on the CM79 corner (northeast tip), it was actually also in three other adjacent grid squares (CM89 to the east, CN70 the the north, and CN80 to the northeast). The ARRL VHF rules provide for this type of operation as long as some portion of the entire station (power supply, transmitter, antenna) occupies all four grids.
Planning - and Plans Change
Reading through the ARRL VHF Contest rules, it seemed simple enough. I'd need to carry my normal portable satellite radio equipment up to the location of the grid intersection, and start operating.
Since satellites are moving targets, and I've always worked satellites by tracking them with the antenna, I figured there was no way to activate CM79 without also being on the ridgetop (70' uphill from the grid corner) so that I could steer the antenna and track the satellite as it went by. My plan was therefore to have the station power supply directly at the CM79/89/CN70/80 grid corner, and my transmitter and antenna up on the ridge so that I could follow the sats.
Everything seemed fine with this until an email from the ARRL HQ: they had been discussing my plans and felt that having just the power supply at the grid corner wasn't sufficient to claim that the station was in four grids simultaneously. The transmitter itself has to be at the intersection. This certainly made me rethink my plans!! Since satellite operation requires constant tuning of the radios, that meant my operating position as well had to be down the hillside in order to be directly over grid corner. And that also meant having to use a remote antenna system like Russ did, except at mid-VHF and UHF frequencies where line losses are significantly greater. Even more importantly, being 70' down a brushy hillside from my antenna would mean that I would no longer be able to steer the antenna towards the satellites as they went by!!
More Planning - Possible Solutions?
The first realization that I had was that if the satellites are going overhead, or are heading out over the ocean to the west, then I don't actually need a remote antenna setup. I can use the satellite elevation itself to do the "work" of lifting my signal over the ridgetop! I figured about 2/3rds of the passes would be overhead or to the west, where I wouldn't have to use a remote antenna at all. That just leaves the remaining 1/3 of passes to the east: how to allow the east coast stations to work me through the remote setup.
My second realization was that even though I'd be losing almost 50% of my signal power at UHF frequencies with a remote antenna, I could maybe overcome this. I could use extremely low-loss coax. I could use a preamplifier at the antenna (to boost the feeble UHF downlink signal coming from the satellite before it entered the cable), and a higher-powered transmitter (to put more UHF power into the cable on the uplink to begin with). Maybe I'd still have enough signal to work the east coast stations?
My third realization was that I didn't really have to continuously track the satellites as they went by. I could point the antenna at a fixed point in the sky, and let the satellite pass into view and out again. Then I could run back up the hill and re-aim the antenna. I hadn't seen the terrain but was guessing I could do this maybe two or three times during a 15-minute satellite pass.
I described my revised plans in detail to ARRL HQ: I'd have my entire station directly over the grid square boundary for all passes except those to the east, and for eastern passes I'd use the remote antenna on the ridge. At no point would my transmitters or person leave the grid intersection while operating. ARRL HQ advised that this was acceptable. Yay!!!!
Preparation
Unfortunately, the split / remote station setup added significnatly to the amount of stuff to haul up and over the mountain! Notably, 100' of coaxial cable. A high-powered transmitter (the Yaesu FT-857D from my truck). A second 12V battery to power the transmitter (5 pounds of lead and acid). The preamplifier with associated connectors. Another battery box to power the preamp. A second tripod to support the remote antenna. Whew!!!
Added to the list above are my regular satellite-portable station items: two Yaesu FT-817ND radios, the Elk antenna, a tripod to hang them all on, a netbook computer to do the tracking and run the radios, a LiFePO4 battery pack, and 60 watts worth of solar panels. Total system weight was probably around 50 pounds or so, I'm not entirely sure, but it was heavy! I figured I could pack the stuff up the mountain in two separate trips -- one Saturday night after arrival, and one Monday morning.
I tested everything out in the few days prior to the trip, and found that the remote antenna system actually worked. Signals weren't great, but were acceptable for communication. Ready to go!
The Trip - Day 0
After a six-hour drive up the California coast, I arrived at the Wailiki Campground and set up camp. Wailiki campground is dark and feels very remote -- it's in a narrow canyon, and there was only one other camper in the entire campground.
The camp was infested by hordes of mosquitoes! By 5:30pm I had the backpack loaded with the first set of gear (primarily cables, solar panels, batteries, tripods, anything heavy) and was on the trail. Weather was clear and sunny.
The trail up Chemise Mountain is fairly rugged, especially while packing gear. It's part of the Lost Coast Trail, and begins with a 600-foot climb up the northeast slope of the mountain, through tall redwood forest.
The trail then turns south and skirts the eastern of the ridge, then follows the narrow ridge up and down and eventually after a long descent comes to the second intersection of Chincquapin Loop trail. This point is maybe a hundred and some feet northeast of the CM79 grid corner, and is marked with a wooden signpost. (I'd be spending a lot of time sitting and leaning against that signpost in the next two days, waiting for satellites to come by -- it was a nice open and flat spot!)
The hike up the trail went well. It was 2.5 miles from the campground, it it took about an hour and a half to get up there.
My first impressions of the CM79 grid corner were "uh-oh". Rather than being open, the entire area was in a light forest. Enough sunlight trickled through the trees to dapple the ground below, but at UHF frequencies those same trees could significantly block the signals getting out. I worried that would further reduce my already weak signal.
Finding the exact grid intersection by GPS was fairly straightforward -- I used a Garmin Vista HCx (high sensitivity) and it routinely had error figures less than 20 feet even under the tree cover. It also helped that I had seen pictures of the area on the Confluence.Org site, where others had located the -124 West / 40 North boundary just for fun.
After finding the grid intersection, that's when I got my first good look at the hill to the east -- 70 feet of steep slope, covered in slippery leaves, manzanita, and poison oak. I then realized my idea of running up and down to re-aim the remote antenna on eastern passes wasn't going to work -- I'd have to pick a spot and leave it there.
I dropped off the load of equipment, ran out the hundred foot cable connecting the operating location to the tripod on the ridge, and headed back to camp. Travelling lighter without the equipment, I made it back to camp in just over an hour. There was enough daylight to feed myself and a few hundred mosquitoes, and get some rest.
The Trip - Day 1
Day 1 of operating satellites was Sunday August 7th. I was up early packing all the remaining equipment, as well as enough food, water, clothing, and emergency supplies to last the whole day up on the mountain. I also packed a book -- sitting in the woods waiting for satellites to come by is somewhat akin to sitting in an airport waiting for a flight, lots of time to kill!!
At first light I was on the trail to make it up to the CM79 area and get things set up for the first satellite pass. I carried my SPOT Messenger GPS with me -- it relayed my coordinates to a web page, so anyone interested could see where I was on the trip.
Once I arrived at the CM79 area, I left the SPOT on the signpost near the trail intersection (since the SPOT was also a possible lifeline in this remote area, I wanted it to have as much of a view of the sky as I could, in case I had to send out an SOS message with it). I then carried the rest of the equipment to my operating location centered on the grid boundary down the hill, connected up the cables, put up the remote antenna directly on the trail ridgetop, and waited for AO-07 to come by. I was using the FT-857D radio for as much uplink power as possible. The remote antenna was aimed into the forest to the east.
Satellite AO-07 came by, and wow signals were faint! I could barely hear my own CW downlink. Finally I was able to make contact with Drew KO4MA in Florida. I heard AA5PK on but couldn't make a two-way contact. After the pass, I thought "how on earth am I going to do this -- Oscar 7 is normally not too much of a problem, and here in this forest I can barely hear it!".
The next satellite to come by was Oscar 51, a nice loud FM satellite. I had moved my Elk antenna to the operating location on the grid intersection. AO-51 came ... and went ... and I didn't hear **anything**! Oscar 51 is normally the loudest of the sats, and here I was in a forest, feeding mosquitoes, and even with the antenna directly at the radios and steerable, and a western pass out over the ocean with no ridge in the way .... I couldn't hear it!! At that point I had serious thoughts about whether this expedition was even going to be possible.
The third satellite pass was Oscar 7 making another trip around, this time to the west, out over the ocean. I had the Elk antenna still at the operating location on the grid boundary, so there was no need for a remote this time. I held my breath, hoping that being able to steer the antenna this time (and not using the remote antenna) would help. I also ditched the FT-857D with it's 20W output in favor of my normal FT-817ND 5W radio for the UHF uplink -- the reason was that I hadn't configured the '857 for computer control, and I really wanted the computer to do the work of tuning the radio for doppler correction, so I could focus on pointing the antenna. It worked! I was able to make contacts with 3 stations on that pass!! Okay, so maybe there is hope.
Satellite VO-52 then came over at a 70 degree elevation to the east. Since the hill to my east only sloped up at 30 degrees or so, the sat was well above the hilltop so I could use my normal setup -- and I made three nice contacts. Whew! Finally I was getting somewhere. The little Yaesu FT-817ND radios were doing their job!
The next pass was VO-52 as it came around the earth again, this time way out west over the ocean. I again used normal configuation with the antenna right on the tripod at my operating station on the grid corners. I had great downlink signals this time (clearly the 2m downlink of VO-52 was much less attenutated by the foliage than the 70cm downlink of AO-51). I called CQ -- heard myself calling CQ ... and didn't hear anyone else on! Oh well. At this point, I recorded in my notes "Mosquitoes BAD" and I noticed I underlined the word "bad" twice.
Oscar 27 then came by in a low (9 degree elevation) easterly pass. Time to use the remote antenna setup again -- this time with the Advanced Receiver Research SP432VDG GAsFET preamp. I could hear the satellite but just barely -- it should have been strong and clear with that preamp. Obviously the forest was causing a major problem with the UHF downlink.
One thing I noticed (there's a lot of time to reflect when you're sitting on a remote mountain feeding mosquitoes) was that signals seemed to come and go as the satellite passed through openings in the forest. Duh. Of course it does. I then looked at my remote antenna setup (where the tripod was for that first Oscar 7 pass) and realized I had it aimed through many thick trees. Since I brought 100' of LMR-400 cable, and about 75' of it was being used to get the signal up to the top of the hill, I realized that I could use the remaining 25' to put the remote antenna slightly further EAST on the hilltop, into an area that was "less thick" with trees. Not exactly a clearing, but fewer trees to block the signal.
Oscar 27 then came by again, this time much higher to the east. Time to try out the above theory, that my little "clearing" would help the remote antenna and preamp see the satellite. I picked the center of the clearest spot I could and aimed the antenna there, polarized at about 45 degrees ... figuring that even though I can't aim the antenna during the pass, at some point the satellite will have to cross though that window. It worked!!! I made a number of contacts.
Satellite FO-29 came by about an hour later, also to the east. Again I put the remote-antenna-with-preamp-in-clearing idea to the test. Again more contacts! This time I managed to work K8YSE who had missed me the last time I was in CM89 -- now, however, I was at the grid intersection (still trying not to slide down the hill and giving the mosquitoes brunch) so I could give him CM89 plus CM79, CN80 and CN90. Woohoo!
A low eastern pass of Oscar 51 came by in the early afternoon, and I again used the remote-blindly-aimed-antenna-in-a-clearing-with-preamp configuration. Success again! 7 nice contacts.
I was left wondering how the heck a blindly aimed antenna at the end of 100-foot run of coax worked better than my nearly deaf pass of the same satellite earlier that morning. Again, more time to think when just sitting there and waiting. That's when I realized that I didn't have the preamp on in the morning (westerly) pass. I never use a preamp in my normal configuration (Elk antenna on tripod on top of radios), never have needed to. Well, I thought to myself, maybe I should use the preamp in the normal configuration to help overcome the losses on the UHF downlink from the forest. It seems to be working when the antenna is located 100' away, it should help when the antenna is right on my operating location.
Oscar 27 came by on a low pass to the west, and this time I had the preamp installed on the Elk in the normal configuration. It worked! Several more nice contacts!
Before I left on the trip, I had thought the preamp was needed solely to overcome the losses from my necessary 100-foot run of cable ... but now I had realized it was essential to overcome the losses from the forest cover (the GAsFET preamp is much more sensitive than my FT-817ND front end, something I had never noticed before).
SO-50 then came by on an easterly pass -- so I used the remote antenna again. I heard many stations but it was so congested I could only make a few contacts. The system was working, however, so that was good -- blindly aiming the antenna and waiting for the satellite to cross into its view was indeed a way to make contacts.
At some point during the afternoon I recharged the LiFePO4 battery pack with the solar panels in a nice patch of sunlight up the trail to the north. The PowerFilm solar panels worked great, and within an hour had fully recharged the pack. My battery packs are exclusively charged by solar, so incidentally this radio expedition was 100% solar powered!
The last pass of the day was another Oscar 51 pass -- almost overhead. I was able to make quite a few contacts on thie one, using the normal configuration with the addition of the pre-amp. The preamp made steering the antenna a bit more difficult (more weight) but it certianly was working.
It was now about 5pm -- I knew I had to get off the mountain and back to camp. I packed up all the non-essential equipment I could (extra solar panels; the unused FT-857D radio; the lead acid battery, etc) and made it back down with enough daylight to cook dinner. Woohoo!
The Trip - Day 2
The second day on the mountain progressed similarly to the first -- without as much of the learning curve! I now had the station configurations worked out, for both the normal and remote setups.
It also felt good to be fully in compliance with the ARRL VHF rules about grid boundaries -- it was difficult to be down the hill in the bush with the mosquitoes, but it was nice to know that my full station was centered on the grid boundary. At one point I walked in a big circle around my station and took photos of it, while standing in each of the four different grid squares; it was fun to see the grids CM79, CM89, CN70, and CN80 all show up on the GPS when I was only a few feet away from the station in the four different directions!
As per ARRL requirements, I also took video to show the uncut footage of the GPS at -124.00000 +40.00000, zooming out and then showing the station, and even took the video up to the top of the hill to show the remote antenna.
Monday's satellite passes started with Oscar 7 in mode A (my 10-meter mode A antenna was a 40-sloping wire tuned with an Elecraft T1 tuner) ... didn't work well, but I made one contact. Then a VO-52 pass to the east with the remote configuration.
After that, another AO-7 mode A pass where I couldn't hear anything on my tuned longwire. Then another VO-52 pass with great downlinks, up to S8 (and that's without a preamp, for U/V sats I disconnect the preamp to reduce uplink loss) ... called CQ but no one else was on the bird! I then took a "quick" break to carry some more stuff off the mountain -- a simple 5-mile two-and-a-half-hour round trip. Once I got back, an easterly Oscar 27 pass with the remote setup yielded a number of nice contacts. After that one, a very low (5 degree) Oscar 51 pass didn't yield any. 5 degrees above the horizon was just too thick with forest for the remote to work. Next pass was Oscar 27 to the west, with a number of nice contacts again, and then FO-29 to the east with the remote configuration. I was kept busy hauling the Elk antenna up and down the hill!! Finally I had a high easterly Oscar 51 pass which yielded a number of nice contacts again, woohoo!
At that point, 4:30pm, it was again time to pack up and head off the mountain. I rounded up all of my bits: spooled up the remote cable, boxed up the equipment, folded up the two tripods and the Elk, and packed everything into the backpack. Last thing I did was clear the entire area I was and restore it to pretty much the way I found it. I wanted to follow the "leave no trace" philosophy as much as possible to restore the forest area to pre-KB5WIA conditions.
Hiking back down the mountain took about an hour and a half. Interestingly, the fog had cleared out on the ocean, so there were some great views of the coastline through a few gaps in the trees.
When I got back to camp, the mosquitoes were thick! I had other plans, though -- so I packed up the tent and camping equipment (giving the mosquitoes one last dinner) and headed off to Shelter Cove for a nice motel with an ocean-view room. It was a nice way to finish the expedition!
Overall, the trip was a lot of fun, and a lot more challenging than I had originally pictured. I made four trips up and down the mountain hauling equipment, covering roughly 20+ miles and over 5,000 feet of elevation gain. The outcome netted about 23satellites worked, with quite a few QSOs as a result. Best of all, it was a great way to experience this remote part of California wilderness!